3 Movements to Help Sciatica: A Guide to Relieving Nerve Pain
Sciatica, a condition characterized by pain radiating down the leg along the path of the sciatic nerve, is an all-too-common issue that affects millions of people worldwide. Whether it’s due to a herniated disc, piriformis syndrome, or another underlying cause, sciatica can severely impact daily life. But there’s hope – with the right exercises and movements, sciatica pain can be alleviated and, in some cases, even prevented.
In this blog post, we’ll dive into three effective movements for easing sciatica. These exercises, recommended by Dr. Jesse Polanco, a doctor of physical therapy who works with athletes like Chris Barnard, are simple and can be performed at home, giving you the relief you need. Let’s take a look at how these movements target the sciatic nerve and help reduce pain.
Introduction: Meet Dr. Jesse Polanco
Chris Barnard, the founder of Overtime Athletes, recently sat down with Dr. Jesse Polanco to discuss how to effectively address sciatica pain. Dr. Polanco is a highly regarded expert in injury rehabilitation, especially when it comes to helping athletes recover from a variety of musculoskeletal issues, including sciatica. He works closely with Chris and his athletes during health screenings and rehabilitation, ensuring that they are back to performing at their best.
Dr. Polanco emphasizes that sciatica is a common issue that many people face, and while it can be painful, there are steps that can be taken to ease the discomfort. In this post, we’ll be focusing on three key exercises that are gentle on the body, easy to perform, and highly effective at reducing sciatica pain.
What is Sciatica?
Before jumping into the exercises, it’s important to understand what sciatica is and how it affects the body. Sciatica is the result of irritation or compression of the sciatic nerve, the largest nerve in the human body. This nerve originates in the lower back, runs through the hips and buttocks, and extends down the legs to the feet.
When the sciatic nerve is pinched or inflamed, it can cause a range of symptoms, including:
- Sharp or shooting pain down one leg
- Numbness or tingling in the leg or foot
- Weakness in the leg or foot
- Pain that worsens with prolonged sitting or standing
In some cases, sciatica can be caused by a herniated disc, spinal stenosis, or other underlying conditions. However, the good news is that with the right approach, sciatica pain can often be managed, and many people experience significant relief.
1. Nerve Flossing Exercise
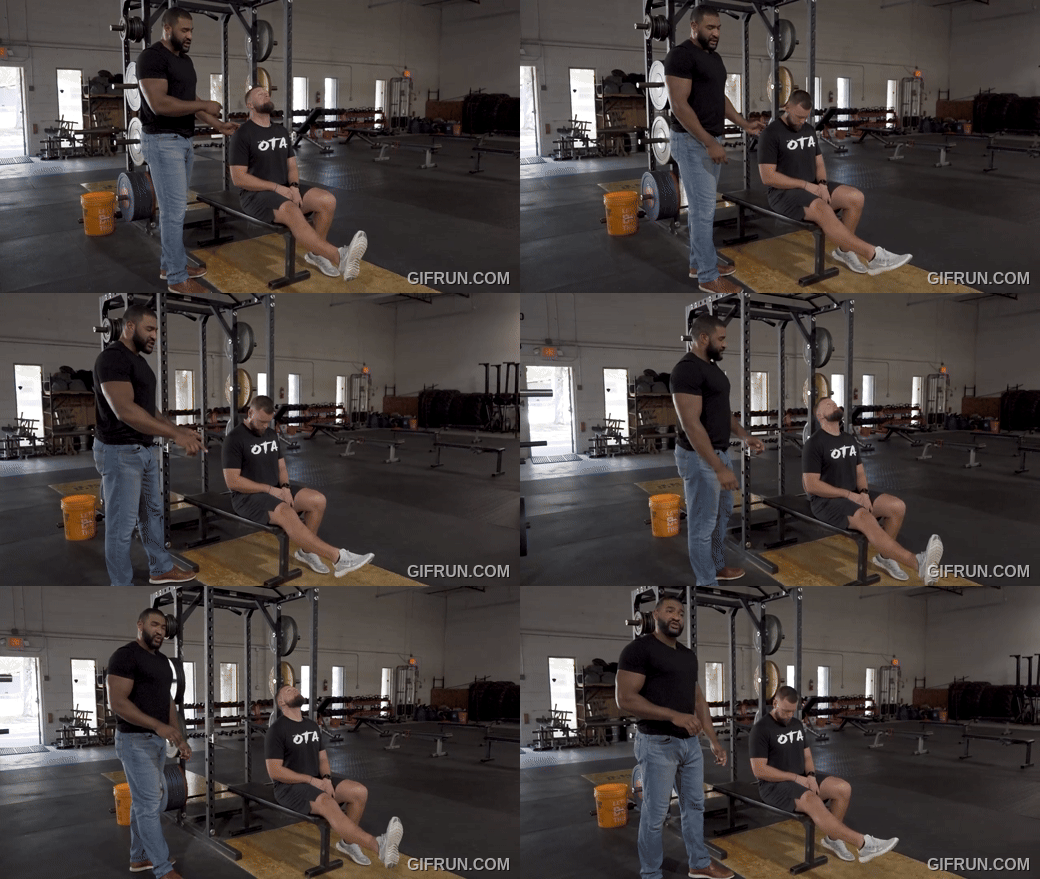
The first exercise on Dr. Polanco’s list is the nerve flossing movement. This exercise is specifically designed to gently mobilize the sciatic nerve, helping to reduce tension and irritation. Nerve flossing is a great way to improve the glide of the nerve and reduce discomfort in the lower back and leg.

How to perform nerve flossing:
- Sit on a chair with both legs extended in front of you. Keep your back straight and relaxed.
- Begin by tilting your head upward, looking towards the ceiling. Simultaneously, lift one leg off the ground, keeping your knee straight and toes pointed upward.
- Next, lower your head toward the floor while simultaneously pointing your toes downward and bringing your leg back to a straight position.
- Alternate between these movements, ensuring that you hold each position for about three seconds.
- Repeat this sequence for 20 reps, aiming for 3 sets per day, but only as long as it doesn’t cause any pain. If any discomfort or pain arises during the movement, stop immediately.
Nerve flossing is a gentle exercise, so it’s essential to perform it slowly and controlled, without forcing the body into uncomfortable positions. The goal is to create a smooth, pain-free glide of the nerve, which can help reduce the pain and discomfort associated with sciatica.
2. 90-90 Hip Mobility Exercise
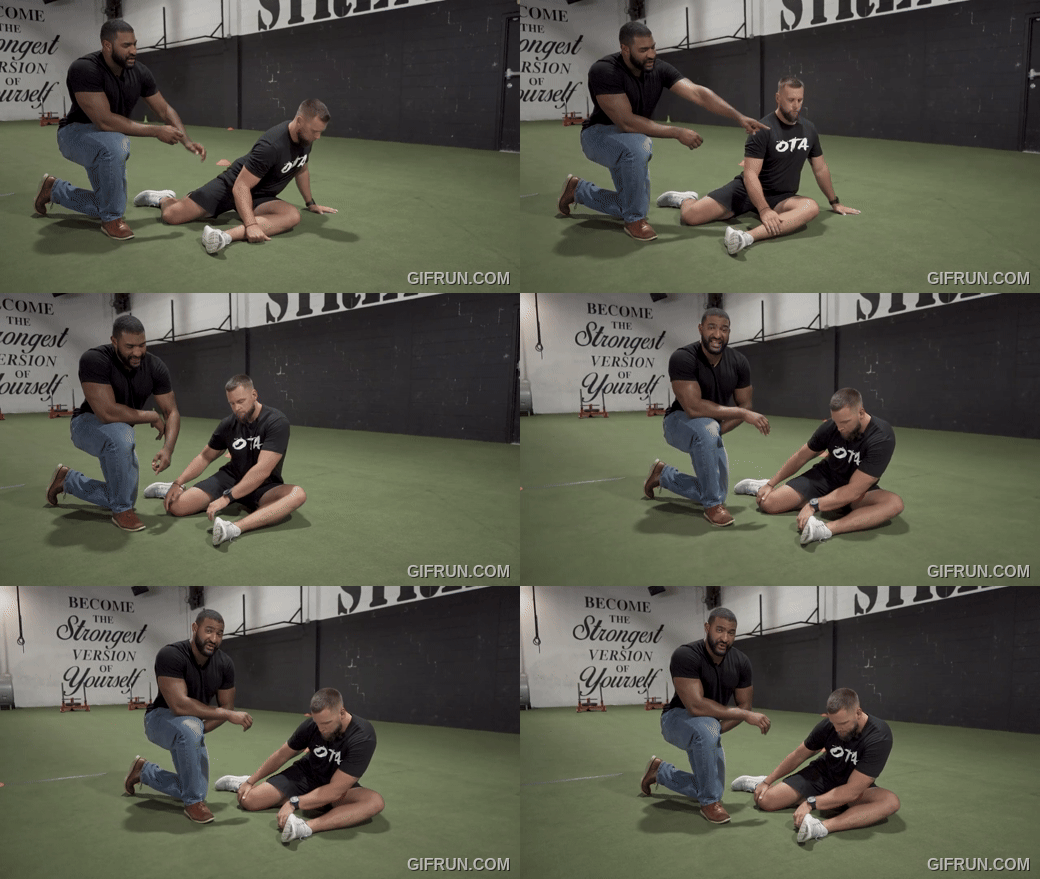
The second exercise in Dr. Polanco’s sciatica rehab plan is the 90-90 hip mobility exercise. This movement targets the hips, which can play a significant role in sciatica pain. Tight or immobile hips, especially the hip flexors and glutes, can contribute to nerve compression and inflammation. Improving hip mobility can relieve pressure on the sciatic nerve and reduce discomfort.

How to perform the 90-90 hip mobility exercise:
- Begin by sitting on the floor with your legs bent at a 90-degree angle. One leg should be in front of you, with the knee bent at a right angle, and the other leg behind you with a similar 90-degree angle at the knee.
- Align your chest with your front knee, and rotate your torso slightly to bring your shoulder toward your front knee. Hold this stretch for 3 seconds to feel the stretch in your glute.
- After 3 seconds, return to the neutral position, and then rotate toward your back leg, bringing your other shoulder toward your back heel. This may feel more challenging, so don’t worry if you can’t reach as far as you would like. Hold for 3 seconds.
- Next, place your hands on the ground for support and lift your back heel off the ground, keeping your toes down. You may feel some cramping or tightness in the hip flexor or thigh, which is normal.
- Repeat the movements on both sides, doing 10 reps on each side for a total of 20 reps. Perform this exercise 1-3 times a day.
The 90-90 hip mobility exercise not only stretches the muscles around the hip but also helps to mobilize the joints, which can alleviate tension on the sciatic nerve and improve overall movement.
3. Lumbar Posterior Pelvic Tilt
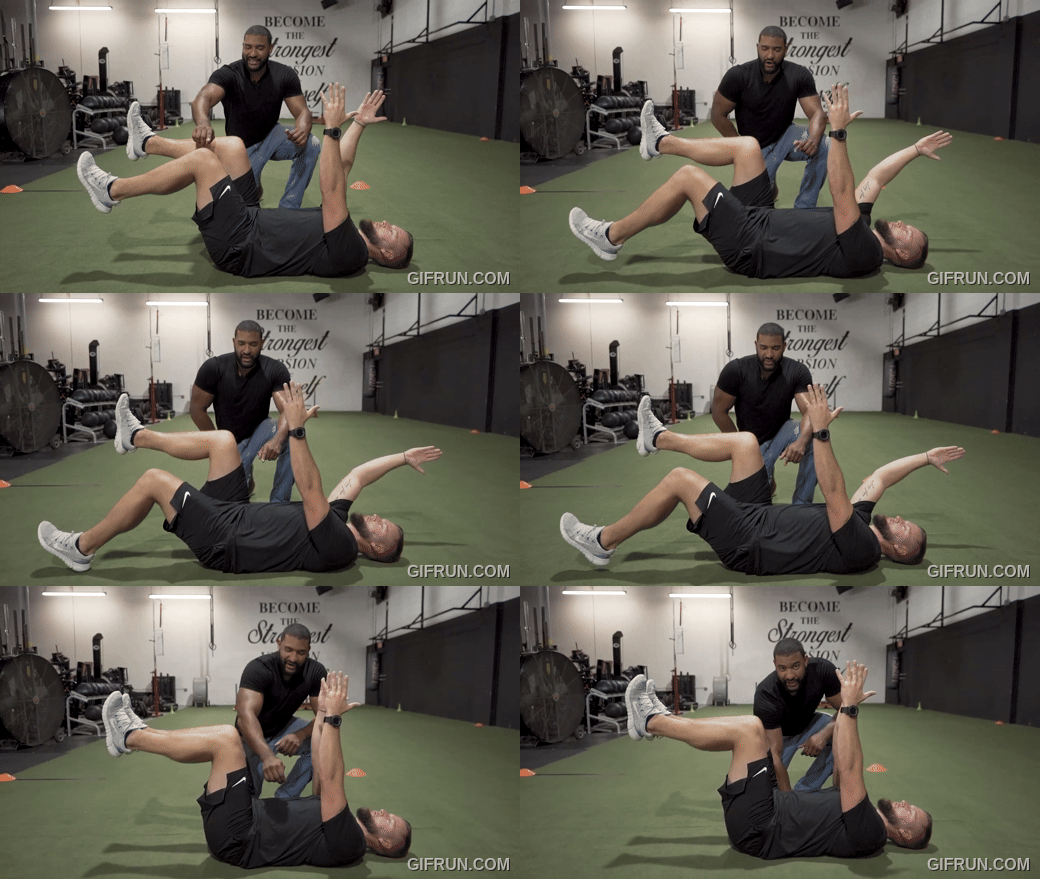
The third and final exercise to help relieve sciatica is the lumbar posterior pelvic tilt, also known as the “dead bug” position. This exercise is excellent for strengthening the core and stabilizing the lumbar spine, which is crucial for maintaining proper posture and alignment of the spine. Strengthening the core muscles can help take pressure off the sciatic nerve and prevent further irritation.

How to perform the lumbar posterior pelvic tilt:
- Lie on your back with your knees bent at a 90-degree angle and your feet flat on the floor. Your arms should be extended straight up towards the ceiling.
- Slowly raise both legs to form a 90-degree angle at the hip and knee. Ensure that your lower back is flat against the floor.
- Alternate extending one leg straight out while keeping the other leg in the starting position. Maintain the tilt in your pelvis, making sure your lower back stays pressed against the floor.
- Perform 10 reps on each side, aiming for 20 total reps. Hold each leg extension for 1 second before returning to the starting position.
- Repeat 1-2 times per day.
This exercise is excellent for building core stability and pelvic control, which can significantly reduce lower back and leg pain associated with sciatica. By strengthening these areas, you help protect the sciatic nerve from further irritation.
Conclusion
Sciatica can be an incredibly painful and debilitating condition, but with the right exercises, you can find significant relief. The three movements outlined in this post—nerve flossing, 90-90 hip mobility, and lumbar posterior pelvic tilt—are excellent tools to help reduce pain and improve mobility. Remember to perform these exercises consistently, focusing on slow, controlled movements, and listen to your body. If you experience any sharp or increased pain, stop and consult with a healthcare professional.
With regular practice, these exercises can help reduce sciatica symptoms and promote long-term spine and nerve health. Start incorporating them into your daily routine and feel the difference!
